Dumping redux state on log out

When a user signs out of my mobile app and signs in as a different user, we need to make sure no application state can be carried over.

Adding a simple ‘LOGGED_OUT’ action that drops the application state is a straight forward solution. I’m keeping a few properties.

Here’s the normal reducers object that is exported.

var { combineReducers } = require('redux')

const reducers = combineReducers({
  attachments: require('./attachments'),
  user: require('./user'),
  //...etc
});

module.exports = reducers //or export default etc.

We can wrap the existing reducer with a single reducer that resets the state. Below, I’ve chosen to keep a few properties of my application state (out of about 20).

//existing reducers
const reducers = combineReducers({
  attachments: require('./attachments'),
  user: require('./user'),
  //...etc
});

//wrapped with the logged out action
const reducersWithLogoutDumpState = (state, action) => {
  if (action.type === 'LOGGED_OUT') {
    let newState = {}
    ['projects', 'device', 'user'].map(k => {
      newState[k] = state[k]
    })
    state = newState
  }
  return reducers(state, action)
}

module.exports = reducersWithLogoutDumpState

Here I’m creating a fresh state object (newState) and retaining the projects, device, and user properties from the old state.

Note that the export has changed to the new function name, so there’s no other changes throughout the application.

(An adaptation of the answer here: https://stackoverflow.com/questions/35622588/how-to-reset-the-state-of-a-redux-store.

Handling payments securely in React Native

I’m rebuilding an e-commerce mobile app side project (WooToApp) that requires payment for orders created.

The initial gateway is Paypal, but it’s an important part of the mobile app that there could be many more gateways, so the architecture needs to be re-usable and secure.

Basic architecture

Assumptions

We need to assume that the mobile app context is insecure. It’s easy to decompile a mobile app and extract keys, and it’s easy to copy HTTP requests to update an order as paid. Both of these are deal breakers.

We can assume the payment gateway and the app backend are secure.

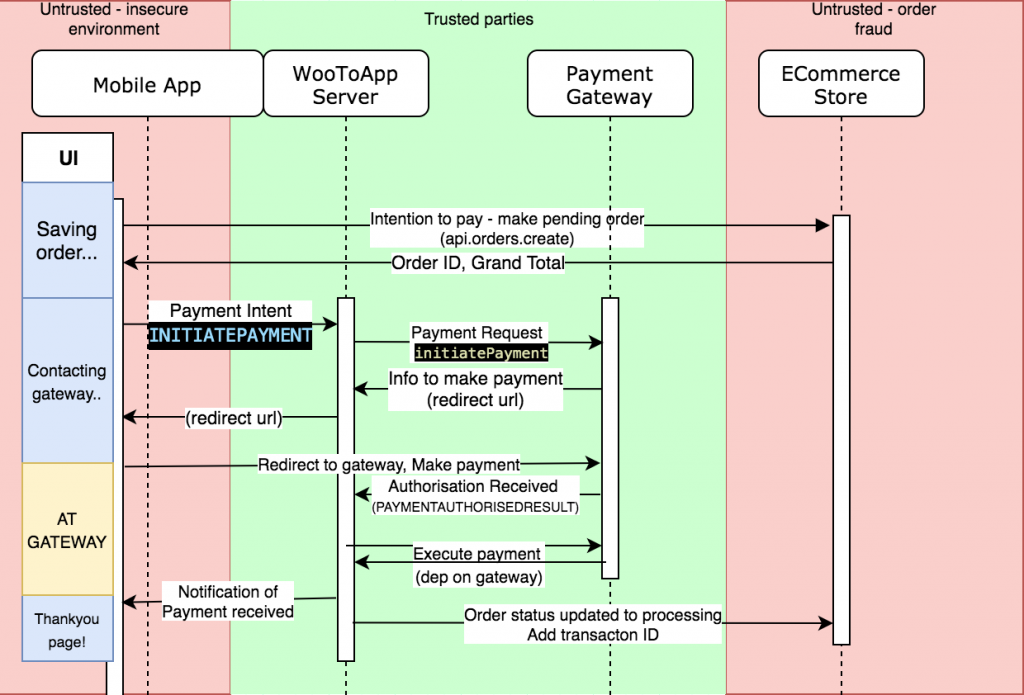
With these assumptions, I made this quick architecture map to follow.

Quick explanation

It’s a relatively common pattern – the mobile app signals intention to pay to the backend.

The backend talks to the gateway, and returns the mobile app just enough information to pay (a redirect to a payment page)

The gateway then notifies the backend that payment has been authorised, which updates store and the mobile app.

Note above that the only components doing any sort of heavy lifting are our trusted components (app backend and payment gateway). We don’t trust any sensitive data from the mobile app or the ecommerce store.

Explicitly defining the architecture before starting work (and fine tuning along the way) means it’s easy to get into ‘thinking’ mode and define the secure boundaries and map it out.

In the next sitting when it’s time to write the implementation, the architecture and security considerations are both fresh in your mind AND documented. It’s a lot easier than architecting and reasoning about security along the way.

Payment Handling

I won’t dive into the server side payment handling here. There’s nothing exciting there, it’s just nothing innovative. A nodejs script (the app backend) captures the payment request from the mobile app and creates a payment request that paypal understands. Paypal gives the backend a redirect URL.

In the mobile app, we should a secure frame for the customer to make payment to the gateway. Paypal redirects the user to a URL that notifies the backend that payment was received, which redirects the user to the app thankyou page.

The mobile app has zero knowledge of paypal libraries and integrations. There’s no surface area for the mobile app to be vulnerable. Secret keys are never safe in a mobile application.

Payment UI

This is a pretty important one. The regular webview in React Native is susceptible to manipulation and as far as I know should not be used for any type of third party secure communication in React Native. For example, an app developer is able to inject a JS keylogger. It’s flawed by design.

iOS and Android both make a secure browser context available that is not susceptible to manipulation, which has been abstracted into a useful library here.

Once payment has been made, the gateway success URL redirects back to a deep link for the mobile app (think myapp://order-paid/505). React-Navigation deep linking works with simple code changes to handle this.

There’s a small issue to work around – the popped out web browser context successfully causes the deep link to fire and navigate to the correct page in the mobile app, but you can’t see it because the web browser context stays open on the top.

The Order Paid page will always be the result of a deep linked action, so we can just hide the browser when the page initiates.

Notes: Building a React App using Lambda, Dynamo DB and API Gateway – Part 1 (The back-end)

These are notes and additions from working through this youtube video. In the video and in the notes below, the AWS CLI is used to configure Lambdas, a Dynamo DB and an API Gateway.

Setting up an IAM user

Visit the IAM Console and create a ‘Programmatic Access’ user.

Add the user to ‘Administrator’ group.

Install the AWS CLI tools.

brew install awscli

Configure AWS CLI tools.

aws configure

Paste in the Access Key ID and the Secret Access Key. Leave region name and output format as defaults.

Dynamo DB – Create a table

aws dynamodb create-table --table-name ToDoList \
--attribute-definitions AttributeName=Id,AttributeType=S \
AttributeName=Task,AttributeType=S \
--key-schema AttributeName=Id,KeyType=HASH \
AttributeName=Task,KeyType=RANGE \
--provisioned-throughput ReadCapacityUnits=5,WriteCapacityUnits=5

We’ve created a table with columns Id (S=String) and Task (S=String).

We’ll need the TableArn later, so use this JQ command to store the TableArn in an environment variable.

TABLEARN=$(aws dynamodb describe-table --table-name ToDoList | jq '.Table .TableArn')

Create role and policy

The role is a fairly standard template, and is just a bare role with lambda access.

Save the following to lambda_role.json

{
	"Version": "2012-10-17",
	"Statement": [
		{
			"Effect": "Allow",
			"Principal": {
				"Service": ["lambda.amazonaws.com"]
			},
			"Action": "sts:AssumeRole"
		}
	]
}

Create the role on AWS:

aws iam create-role --role-name lambda-role --assume-role-policy-document file://lambda_role.json

The policy adds put and scan permissions to the role.

Create policy.json and add the following. Replace the Resource value with the output from echo $TABLEARN (that we saved above).

{
	"Version": "2012-10-17",
	"Statement": [
		{
			"Effect": "Allow",
			"Action": ["dynamodb:PutItem", "dynamodb:Scan"],
			"Resource": "replace me---->arn:aws:dynamodb:us-east-1:478724445133:table/ToDoList"
		}
	]
}

Attach the policy to the role.

aws iam put-role-policy --role-name lambda-role --policy-name dynamodb-access --policy-document file://policy.json

We’ll save the role ARN for use later (we need to assign it to the lambda scripts later on).

ROLE_ARN=$(aws iam list-roles | jq '.Roles[] | select(.RoleName=="lambda-role") | .Arn' -r) && echo $ROLE_ARN

Create the node.js scripts & turn them into Lambdas.

First up is the file that fetches our to-dos from DynamoDB. It uses a full scan, and there’s no filtering or paging.

Run code get.js and drop in this code to scan the table:

const AWS = require("aws-sdk");

const documentClient = new AWS.DynamoDB.DocumentClient();

exports.getAllTasks = (event, context, callback) => {
	const params = {
		TableName: process.env.TABLE_NAME,
	};

	documentClient.scan(params, (err, data) => {
		if (err) {
			callback(err, null);
		} else {
			callback(null, data.Items);
		}
	});
};

zip it up with zip get.zip get.js

We’ll push up get.zip and turn it into a lambda:

aws lambda create-function --function-name get-all-tasks --zip-file fileb://get.zip --runtime nodejs8.10 --role "$ROLE_ARN" --handler get.getAllTasks --environment Variables={TABLE_NAME=ToDoList}

Same goes for post.js. code post.js, paste this code in. This takes the task supplied and pushed it to the TableName table in DynamoDB. TableName will be populated by an environment variable later when we use these lambdas.

const AWS = require("aws-sdk");

const uuid = require("uuid");

const documentClient = new AWS.DynamoDB.DocumentClient();

exports.addTask = (event, context, callback) => {
	const params = {
		Item: {
			Id: uuid.v1(),
			Task: event.task,
		},
		TableName: process.env.TABLE_NAME,
	};

	documentClient.put(params, (err, data) => {
		if (err) {
			callback(err, null);
		} else {
			callback(null, data.Items);
		}
	});
};

Zip it up: zip post.zip post.js

Save as a lambda function:

aws lambda create-function --function-name add-task --zip-file fileb://post.zip --runtime nodejs8.10 --role "$ROLE_ARN" --handler post.addTask --environment Variables={TABLE_NAME=ToDoList}

Creating the API

Creating the API involves a ton of steps. I’ve made heavy use of environment variables below to save the chopping/changing and leave less room for errors.

  1. Creating the API Gateway
  2. Creating the route (resource)
  3. Adding methods to the route (GET & POST)
  4. Adding responses to the methods
  5. Adding integrations (connecting up the lambdas)
  6. Adding integration responses
  7. Deploy to a stage

Create the API:

aws apigateway create-rest-api --name 'To Do List'

Capture the Rest API ID (into APIID) for later use (we will need to use this *a lot*. Capture the ROOT ID as well (the ID of the resource that serves /

APIID=$(aws apigateway get-rest-apis | jq '.items[] | select(.name=="To Do List") | .id' -r) && echo $APIID
ROOTID=$(aws apigateway get-resources --rest-api-id $APIID | jq '.items[] | select(.path=="/") | .id' -r)

Create the /tasks resource/route. (And on the second line, capture it in an environment var)

aws apigateway create-resource --rest-api-id $APIID --parent-id $ROOTID --path "tasks"
TASKSID=$(aws apigateway get-resources --rest-api-id $APIID | jq '.items[] | select(.path=="/tasks") | .id' -r)

Add GET and POST methods to the new /tasks endpoint

aws apigateway put-method --rest-api-id $APIID --resource-id $TASKSID --http-method GET --authorization-type NONE
aws apigateway put-method --rest-api-id $APIID --resource-id $TASKSID --http-method POST --authorization-type NONE

Add a 200 response handler to the 2 new methods.

aws apigateway put-method-response --rest-api-id $APIID --resource-id $TASKSID --http-method GET --status-code 200
aws apigateway put-method-response --rest-api-id $APIID --resource-id $TASKSID --http-method POST --status-code 200

Create the integrations: head over to the AWS Management Console and manually wire up the Lambda to the API Gateway (GET/POST)

Connecting the lambda to the API Gateway method is an integration. Add an integration response of 200 for the 2 integrations.

aws apigateway put-integration-response --rest-api-id $APIID --resource-id $TASKSID --http-method GET --status-code 200 --selection-pattern ""
aws apigateway put-integration-response --rest-api-id $APIID --resource-id $TASKSID --http-method POST --status-code 200 --selection-pattern ""

Now we’re ready to deploy the API. Pick a stage name (such as dev) and deploy the API to the stage.

aws apigateway create-deployment --rest-api-id $APIID --stage-name dev

Now you can request the todos from the API, and post new todos.

Note ‘dev’ below is the stage name. Save the endpoint address:

ENDPOINT=https://$APIID.execute-api.us-east-1.amazonaws.com/dev/tasks

Save a new item to the endpoint:

curl -X POST -d '{"task": "Eat"}' $ENDPOINT

Request all items from the endpoint (and use jq to pretty print):

curl -X GET $ENDPOINT -s | jq
Intro to AWS using CLI tools

Following along some useful youtube videos, I’ve created a cheat sheet below for reference when setting up AWS services using the CLI tools.

This post assumes a level of familiarity with basic AWS services through the management console – you should know what a security group is and what an instance is, etc.

Youtube videos:

1. cli basics: https://www.youtube.com/watch?v=_P0fgqt99RA
2. cloudformation basics: https://www.youtube.com/watch?v=EVK8ultk-u0
3. lambda basics: https://www.youtube.com/watch?v=ZybIYqjXt1g

The snippets below assume the aws command line tools have already been installed , via a guide such as this one for installing AWS tools with pip.

You should also install jq via brew, as responses by default are JSON objects. JQ allows easy filtering to fetch for example an array of IDs from a big JSON response:
brew install jq

CLI Basics

On a fresh CLI install, we have no permissions. Run aws configureto enter a set of API keys that will be used through the process.

To create a new EC2 instance, we need pre-requisite security groups to access the instance and a key pair to connect to the instance.

Create a security group

Creating the security group, with no rules:

aws ec2 create-security-group --group-name cli-example --description "this is the cli example"

The response will return a “GroupId”. You should capture this in a text doc for later.

{
    "GroupId": "sg-0666aba64453e0791"
}

Opening up SSH on the security group

aws ec2 authorize-security-group-ingress --group-name cli-example --protocol tcp --port 22 --cidr 0.0.0.0/0

Allows ANY IP through the security group via TCP/Port 22. In production, this IP range should be seriously limited.

Creating a keypair to SSH in

aws ec2 create-key-pair --key-name test-key --query "KeyMaterial" --output text > test-key.pem

Creates a keypair and saves the private key to ‘test-key.pem’. The key has too many permissions by default, so it’s important to give it only ‘user read’ permissions (400)

sudo chmod 400 test-key.pem

It’s worth mentioning that commands have a corresponding describe command. In this case, we can describe the key pairs attached to the account. It’s useful to check what’s still running on cleanup, and to check what was actually created in the case of failures.


aws ec2 describe-key-pairs

Finding and creating an instance

We’re going to gloss over a whole giant part here of working out what image you want, and assume you’re happy to use the pre-configured Amazon Linux 2 AMI.

Using a describe-images request and some clever jq (installed at the start) we can return the AMI for the latest Amazon Linux 2 AMI. At the time of this post, it’s ami-0b898040803850657

It’s time to spin up an instance with the AMI ID, security group ID, and key pair we made above. Make sure to drop yours in below instead of mine:

aws ec2 run-instances --image-id ami-0b898040803850657 --security-group-ids sg-0666aba64453e0791 --instance-type t2.micro --key-name test-key

Extract the InstanceId and PublicIpAddress from the response, and connect to the public IP address using the private key.

ssh [email protected] -i test-key.pem

With any luck, you’ll be connected to your new instance!

When you’re done, make sure to kill the instance.

aws ec2 stop-instances --instance-ids "i-0a7cbe4f97c0515a0"

Describe the instances until you can see that the instance has stopped.


aws ec2 describe-instances | jq '.Reservations[].Instances[] | [.State, .InstanceId]'
[
  {
    "Code": 80,
    "Name": "stopped"
  },
  "i-0a7cbe4f97c0515a0"
]
[
  {
    "Code": 16,
    "Name": "running"
  },
  "i-0ae6334455914efdb"
]

Deploying a React Native Web project with CircleCI

  1. Generate a private & public SSH key for the CI server.
    1. Paste the private key into circle CI.
    2. Grab the key fingerprint from circle CI for later.
    3. Paste the public key into ~/.ssh/authorized_keys/ on the host.
  2. Create a .circleci folder in the root of your project with a config.yml file underneath.
  3. Adjust the following circle CI config as necessary. The file:
    1. loads a node environment
    2. allows the fingerprint supplied to connect
    3. restores cached node_modules and yarn cache
    4. runs yarn install
    5. saves caches
    6. adds expo-cli – currently does not cache, so will play with that further
    7. builds the project (into web-build/ subfolder)
    8. uploads the project via scp to the remote server
version: 2
jobs:
  build:
    working_directory: ~/web
    docker:
      - image: circleci/node:8
    steps:
      - add_ssh_keys:
          fingerprints:
            - "<the ssh fingerprint from above>"
      - checkout
      - restore_cache:
          key: yarn-v1-{{ checksum "yarn.lock" }}-{{ arch }}

      - restore_cache:
          key: node-v1-{{ checksum "package.json" }}-{{ arch }}

      - run: yarn install

      - save_cache:
          key: yarn-v1-{{ checksum "yarn.lock" }}-{{ arch }}
          paths:
            - ~/.cache/yarn

      - save_cache:
          key: node-v1-{{ checksum "package.json" }}-{{ arch }}
          paths:
            - node_modules

      - run: yarn global add expo-cli
      - run: CI=false && yarn web-build && CI=true
      - run: scp -o StrictHostKeyChecking=no -r ./web-build/* user@host-server-ip-address:/var/www/path/to/app/

As the project wears on, I’ll add some unit testing and end to end testing to this pipeline.

Footnote: Deploying expo build:web to a subfolder

I had a hell of a time finding the right incantation to get this working. There’s different advice everywhere.

The solutions are not:

  • homepage field in package.json
  • Anything in app.json
  • Any command line flags/switches in expo build

The solution is to customize expo’s webpack file, to specify that there is an output subdirectory.

  • Run expo customize:web and choose to export webpack.config.js
  • Specify the public path required. e.g. my webpack.config.js now looks like:
const createExpoWebpackConfigAsync = require("@expo/webpack-config");

module.exports = async function(env, argv) {
  const config = await createExpoWebpackConfigAsync(env, argv);
  // Customize the config before returning it.

  config.output.publicPath = "/app/";
  return config;
};
  • Note the addition of config.output.publicPath

Forcing use of Yarn, instead of npm install

Everyone knows if there’s a package.json, then you need to npm install to install dependencies for the project.

Unless there’s a yarn.lock! When sharing a project around a team this will happen over and over.

Share project -> team mate ignores instructions -> generates & checks in a package-lock.json. Packages are resolved differently, different bugs are seen, lock files are not honored.

Adding a preinstall command to force the user to use ‘yarn’ puts a hard roadblock in front of unsuspecting npm installers.

"scripts": {
  ...
  "preinstall": "node -e \"if(process.env.npm_execpath.indexOf('yarn') === -1) throw new Error('You must use Yarn to install, not NPM')"
  ...
}

Now, npm i yields:

Error: You must use Yarn to install, not NPM

WooCommerce TypeScript definitions

I’m working on a project that consumes WooCommerce API in React Native.

To keep everything up to date, use type-hinting, and see dynamic issues *before* I’ve compiled the code, I’m using TypeScript definitions for WooCommerce.

Type definitions are supplied for Category, Product, Variation, Attribute, Image. Other less important types are also included (Collection, Dimensions, MetaData, etc).

Grab the types at the link below. Pull requests welcome.

https://github.com/rrrhys/wootoapp-rewrite/blob/master/app/types/woocommerce.d.ts

Converting React Components to use Hooks (useEffect and useState)

This isn’t a finished article, it’s a work in progress. I’m learning React Hooks, so there may be factually inaccurate information below. Let me know if you know that to be the case!

Functional Stateless Components are prerequisite learning to Hooks.

Functional components are a function that accepts props and returns a React component.

// a class component
export default class Footer extends React.Component {

 render(){
    const {props} = this;
    return <Text>Hi {props.name}</Text>
 }
}

// a functional component
const Footer = (props) => {
  return <Text>Hi {props.name}</Text>
}
export default Footer

Hooks extend this simple model with the ability to manage state (via useState) and manage side-effects (via useEffect).

useState accepts an initial state (that is only used on load) and returns both the current state and a state modifier function, for further state changes. It’s easier than it sounds:

const initialState = {
  sidebarVisible: false
}
const SidebarComponent = (props) => {
  // initialState will be used to populate currentStatre.
  const [currentState, setState] = 
  useState(initialState)

  // we can use setState from above to change the state now, when the user clicks open.
  openClicked = () => {
    setState({...state, sidebarVisible: true})
  }

  return state.sidebarVisible && <View><Text>Something here</Text></View>
}

useEffect accepts an anonymous function to execute the side effects, and a watched array of parameters. Side effects are pretty much any code that runs based on changes that does not instantly update the UI (API calls etc).

useEffect(() => {
  // fetch some data
  api.users.get(props.id)
}, [props.id])
// the side effect will run when props.id changes.

It’s hard (/mentally taxing) to refactor from old class components to functional components and change the lifecycle methods to useEffect/useState all at the same time. I’m not sure I’d refactor a codebase to this style for the sake of it.

I’m also interested to see the effect when writing new code in this style, rather than refactoring over to it. It’s a totally different lifecycle consideration and I think the code would be completely different.

Accessing local index.html from outside world with zero config

On a development box with nginx or vagrant set up and a bunch of virtual hosts, this is pretty straight forward. Grab the folder, push it to a dev server, set up a virtual host and go.

Since largely moving away from day to day web development I don’t have a local vagrant box. I don’t have an easily accessible dev server at work, and I just needed to view a project from the outside world.

So with no local web server setup, here’s how to serve your project to the outside world (in my case, just a bare .html file and a few .js files)

With NPM set up and configured locally, this is stupid easy.

1.

npx https-server
Great, it’s available locally at those addresses.

2.

npx ngrok http 8080
And now it’s available to the outside world (for the next 8 hours)